fbpx

Revit View Range is a fairly confusing topic, and it seems that many people I talk to just use trial and error to adjust the view range until the view looks the way that they want. In fact, this is the method I had previously used, until I was asked to explain the view range. I stumbled through explaining what I thought it was and concluded with the fact that I usually just adjusted the settings until I could see what I wanted to see. While this works, this is not the way to go.

When I realized I didn’t know how to answer the question properly and that the only advice I could give was to use trial and error, I decided that I needed to do some research and figure it out once and for all. In fact, that’s what drove me to choose this topic for this post. I understand how confusing this topic can be, because it confused me for quite some time as well, and I wanted to provide a proper and thorough answer for those asking, “How does the View Range work?”

What is the View Range?

First of all, what is the View Range? Revit’s View Range, sometimes referred to as the Visible Range, is a “set of horizontal planes that control the visibility and display of objects in a plan view” (knowledge.autodesk.com). Every plan view, including reflected ceiling plans (RCP), have this property. The View Range is made up of a primary range and the view depth. The primary range is defined by three horizontal planes: a top plane, a bottom plane and a cut plane.

The top plane represents the top of the View Range and the bottom plane represents the bottom of the View Range. The cut plane is located between the top and bottom planes, and it is the dividing line that determines how elements are displayed in the view. The additional plane beyond the primary range is the View Depth. By adjusting the View Depth, you can control the visibility of elements below the bottom plane of the primary range.

Revit floor plan
Revit view range

Element Visibility

Now that we’ve defined the View Range, let’s discuss how it affects the visibility of elements in the view. Generally, elements outside the view range do not display. If you need to work around this to have certain elements outside the View Range visible in your view, you can set an underlay to display a level outside the View Range. Each element that is within the view range is displayed using the cut line weight, projection line weight, or the <Beyond> line style.

The element used to display objects is determined by the height of the cut plane. Elements below the cut plane will be displayed with the projection line weight, and elements that the cut plane intersects with will be displayed with the cut line weight. Elements above the cut plane are not displayed unless their categories are window, casework or general models. These elements are displayed using the projection line weight when they are above the cut plane.

In some cases, elements that are intersected by the cut plane will be displayed using the projection line weight rather than the cut line weight. There are two reasons that this would happen:

  1. Walls shorter than 6 feet (2 meters) are not cut, even when they are intersected by the cut plane. For example, if the top of your wall is 6 feet above the bottom plane, the wall will be “cut” at the cut plane, but if the top is less than 6 feet, the entire wall will be displayed with projection lines. This always happens when the Top Constraint for the wall is set to ‘Unconnected’. If you set the Top Constraint, then the height of the cut plane will be used to determine if the wall is displayed with the cut line weight or the projected line weight.
  2. The other reason that “cut” elements might be displayed with the projection line weight is that for some categories, certain families are simply non-cuttable. For these families, it is just the rule that they are displayed with the projection line weight even if they are intersected by the cut plane.

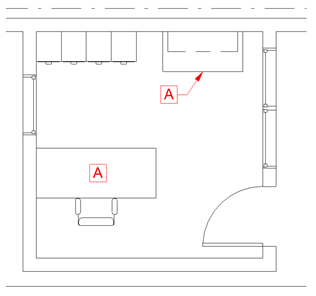
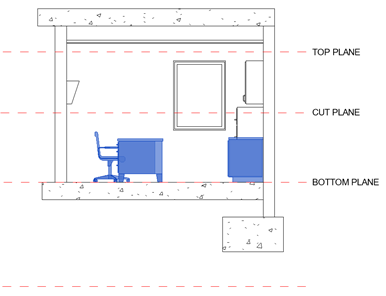
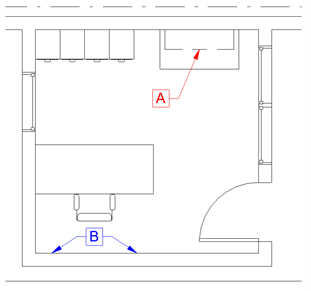
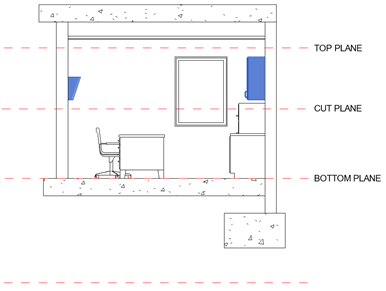
Note, the non-cuttable families are:  Air Terminals, Cable Tray Fittings, Cable Trays, Casework, Communication Devices, Conduit Fittings, Conduit, Data Devices, Detail Items, Duct Accessories, Duct Fittings, Duct Placeholders, Ducts, Electrical Equipment, Electrical Fixtures, Entourage, Fire Alarm Devices, Flex Ducts, Flex Pipes, Furniture, Furniture Systems, HVAC Zones, Lighting Devices, Lighting Fixtures, Mechanical Equipment, MEP Fabrication Containment, MEP Fabrication Ductwork, MEP Fabrication Hangars, MEP Fabrication Pipework, Nurse Call Devices, Parking, Pipe Accessories, Pipe Fittings, Pipe Insulations, Pipes, Planting, Plumbing Fixtures, Security Devices, Shaft Openings, Specialty Equipment, Sprinklers, Structural Beam Systems, Structural Rebar Couplers, Structural Trusses, Telephone Devices and Wires.

You can also display elements that are below the bottom plane by adjusting the View Depth. This is useful for displaying elements such as underground piping or foundations. Elements that are below the bottom plane and within the View Depth are typically displayed using the <Beyond> line style. The exceptions to this are elements that are defined as floors, structural floors, stairs or ramps. These elements have an adjusted range that is 4 feet below the bottom plane, and they are displayed using the projection line weight within this adjusted range. If they are below the adjusted range but still within the View Depth, they are displayed using the <Beyond> line style.

Below are some examples of how the View Range is affecting different elements in a plan view.

Elements Intersected by the Cut Plane

In the section below, elements that are intersected by the cut plane are highlighted in blue.

The floor plan below shows the following:

A. Elements that are displayed using the cut line weight. These are the walls, doors, and windows.

B. Non-cuttable elements that are displayed using the projection line weight. These are furniture.

Revit floor plan top view
Revit elements intersected by cut plane

Elements Below the Cut Plane and Above the Bottom Plane

In the section below, elements that are below the cut plane and above the bottom plane are highlighted in blue.

The floor plan below shows the following:

A. Elements that are displayed using the projection line weight because they do not intersect the cut plane. These are the chair, desk, and cabinet.

elements below cut plan and above bottom plane
side view elements below cut plane and above bottom plane

Elements Above the Cut Plane and Below the Top Plane

In the section below, elements that are above the cut plane and below the top plane are highlighted in blue.

The floor plan below shows the following:

A. Element that is displayed using the projected line weight. This is the wall mounted casework, and in this case the dashed line style is defined as the projected line weight for the family.

B. Elements that are not displayed because they are not windows, casework, or generic models. These are the wall sconces.

Elements Below the Bottom Plane and Within the View Depth

In the section below, elements that are below the bottom plane and within the view depth are highlighted in blue.

The floor plan below shows the following:

A. Element that is displayed using the <Beyond> line style. This is the foundation.

B. Element that is displayed using the projection line weight. This is the floor and it is within the 4 foot adjusted range for that category.

top view elements below bottom plane and within view depth
side view elements below bottom plane and within view depth

Reflected Ceiling Plans

The View Range affects the visibility in a Reflected Ceiling Plan (RCP) in a similar, but slightly different way. Remember, an RCP’s view direction is looking up towards the ceiling from the level below. Therefore, the View Range affects visibility of objects in the same way. Elements above, rather than below, the cut plane will be displayed using the projection line weight and, since there isn’t a bottom plane in an RCP, the View Depth is defined upward from the cut plane.

reflected ceiling plans

You may also like:

Contact Us

Newsletter